设计模式
设计模式是针对软件开发中经常遇到的一些设计问题,总结出来的一套解决方案或者设计思路。大部分设计模式要解决的都是代码的可扩展性问题。设计模式相对于设计原则来说,没有那么抽象,而且大部分都不难理解,代码实现也并不复杂。这一块的学习难点是了解它们都能解决哪些问题,掌握典型的应用场景,并且懂得不过度应用。
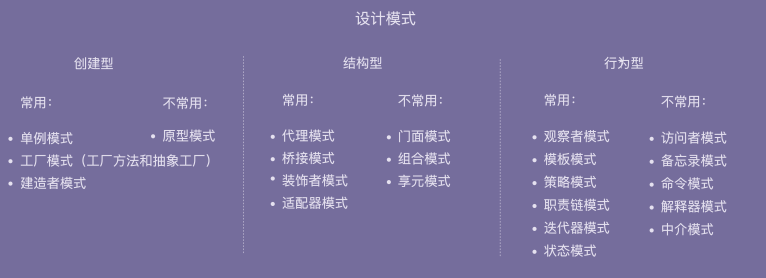
经典的设计模式有 23 种。随着编程语言的演进,一些设计模式(比如 Singleton)也随之过时,甚至成了反模式,一些则被内置在编程语言中(比如 Iterator),另外还有一些新的模式诞生(比如 Monostate)。它们又可以分为三大类:创建型、结构型、行为型。对于这 23 种设计模式的学习,我们要有侧重点,因为有些模式是比较常用的,有些模式是很少被用到的。对于常用的设计模式,我们要花多点时间理解掌握。对于不常用的设计模式,我们只需要稍微了解即可。
UML常用符号说明
UML 类图中常用的符号和表示说明如下:
- 类(Class):用矩形表示,类名写在矩形上方。
- 抽象类(Abstract Class):用带有折角的矩形表示,类名写在矩形上方,折角表示该类是抽象类。
- 接口(Interface):用带有带圆圈的矩形表示,类名写在矩形上方,圆圈表示该类是接口。
- 对象(Object):用矩形表示,对象名写在矩形内部。
- 包(Package):用矩形表示,包名写在矩形上方。
- 依赖关系(Dependency):用带箭头的虚线表示,箭头方向表示依赖的方向。依赖表示一个类的实现需要调用另一个类的方法。
- 继承关系(Inheritance):用带空心箭头的实线表示,箭头指向基类。继承表示一个子类继承了一个父类的属性和方法。
- 实现关系(Realization):用实线箭头和带带圆圈的矩形表示,箭头指向接口,矩形写实现类名。实现关系表示一个类实现了一个接口中定义的所有方法。
- 关联关系(Association):用带箭头的实线表示,箭头指向被关联的类。关联表示一个类与另一个类有联系,可以在关联上标注角色、多重性、名称等。
- 聚合关系(Aggregation):用带空心菱形的实线表示,菱形指向聚合的部分。聚合关系表示一个整体由多个部分组成,但是部分和整体的生命周期可分离。
- 组合关系(Composition):用带实心菱形的实线表示,菱形指向组成的部分。组合关系表示一个整体由多个组成部分组成,但是部分和整体的生命周期不可分离。
这些符号和表示可以帮助我们在 UML 类图中清晰表示出类之间的关系。
创建型
单例模式
单例模式是一种创建型设计模式, 让你能够保证一个类只有一个实例, 并提供一个访问该实例的全局节点。单例拥有与全局变量相同的优缺点。 尽管它们非常有用, 但却会破坏代码的模块化特性。
在某些其他上下文中, 你不能使用依赖于单例的类。 你也将必须使用单例类。 绝大多数情况下, 该限制会在创建单元测试时出现。
单例模式分类
单例模式可以分为懒汉式和饿汉式,两者之间的区别在于创建实例的时间不同:
- 懒汉式:指系统运行中,实例并不存在,只有当需要使用该实例时,才会去创建并使用实例。(这种方式要考虑线程安全)
- 饿汉式:指系统一运行,就初始化创建实例,当需要时,直接调用即可。(本身就线程安全,没有多线程的问题)
适用场景:
- 如果程序中的某个类对于所有客户端只有一个可用的实例, 可以使用单例模式。
- 单例模式禁止通过除特殊构建方法以外的任何方式来创建自身类的对象。 该方法可以创建一个新对象, 但如果该对象已经被创建, 则返回已有的对象。
- 如果你需要更加严格地控制全局变量,可以使用单例模式。
实现方式
- 在类中添加一个私有静态成员变量用于保存单例实例。
- 声明一个公有静态构建方法用于获取单例实例。
- 在静态方法中实现”延迟初始化”。 该方法会在首次被调用时创建一个新对象, 并将其存储在静态成员变量中。 此后该方法每次被调用时都返回该实例。
- 将类的构造函数设为私有。 类的静态方法仍能调用构造函数, 但是其他对象不能调用。
- 检查客户端代码, 将对单例的构造函数的调用替换为对其静态构建方法的调用。
优缺点
优点:
- 你可以保证一个类只有一个实例。
- 你获得了一个指向该实例的全局访问节点。
- 仅在首次请求单例对象时对其进行初始化。
缺点:
- 违反了单一职责原则。 该模式同时解决了两个问题。
- 单例模式可能掩盖不良设计, 比如程序各组件之间相互了解过多等。
- 该模式在多线程环境下需要进行特殊处理, 避免多个线程多次创建单例对象。
- 单例的客户端代码单元测试可能会比较困难, 因为许多测试框架以基于继承的方式创建模拟对象。 由于单例类的构造函数是私有的, 而且绝大部分语言无法重写静态方法, 所以你需要想出仔细考虑模拟单例的方法。 要么干脆不编写测试代码, 或者不使用单例模式。
线程安全
本文仅介绍C++11以后线程安全的实现方法。
- 内部静态变量的懒汉单例(local static)
#include <iostream> // std::cout
#include <pthread.h> // pthread_create
///////////////////  内部静态变量的懒汉实现  //////////////////
class Single
{

public:
    // 获取单实例对象
    static Single &GetInstance();

	// 打印实例地址
    void Print();

private:
    // 禁止外部构造
    Single();

    // 禁止外部析构
    ~Single();

    // 禁止外部复制构造
    Single(const Single &signal);

    // 禁止外部赋值操作
    const Single &operator=(const Single &signal);
};

Single &Single::GetInstance()
{
    // 局部静态特性的方式实现单实例
    static Single signal;
    return signal;
}

void Single::Print()
{
	std::cout << "我的实例内存地址是:" << this << std::endl;
}

Single::Single()
{
    std::cout << "构造函数" << std::endl;
}

Single::~Single()
{
    std::cout << "析构函数" << std::endl;
}
///////////////////  内部静态变量的懒汉实现  //////////////////
// 线程函数
void *PrintHello(void *threadid)
{
    // 主线程与子线程分离,两者相互不干涉,子线程结束同时子线程的资源自动回收
    pthread_detach(pthread_self());

    // 对传入的参数进行强制类型转换,由无类型指针变为整形数指针,然后再读取
    int tid = *((int *)threadid);

    std::cout << "Hi, 我是线程 ID:[" << tid << "]" << std::endl;

    // 打印实例地址
    Single::GetInstance().Print();

    pthread_exit(NULL);
}
#define NUM_THREADS 5 // 线程个数

int main(void)
{
    pthread_t threads[NUM_THREADS] = {0};
    int indexes[NUM_THREADS] = {0}; // 用数组来保存i的值

    int ret = 0;
    int i = 0;

    std::cout << "main() : 开始 ... " << std::endl;

    for (i = 0; i < NUM_THREADS; i++)
    {
        std::cout << "main() : 创建线程:[" << i << "]" << std::endl;

		indexes[i] = i; //先保存i的值

        // 传入的时候必须强制转换为void* 类型,即无类型指针
        ret = pthread_create(&threads[i], NULL, PrintHello, (void *)&(indexes[i]));
        if (ret)
        {
            std::cout << "Error:无法创建线程," << ret << std::endl;
            exit(-1);
        }
    }

    std::cout << "main() : 结束! " << std::endl;

    return 0;
}
输出:
main() : 开始 ...
main() : 创建线程:[0]
main() : 创建线程:[1]
Hi, 我是线程 ID:[0]
构造函数
Hi, 我是线程 ID:[我的实例内存地址是:1]
我的实例内存地址是:0x5642d634b139
main() : 创建线程:[0x2]
0x5642d634b139
main() : 创建线程:[3]
Hi, 我是线程 ID:[2]
我的实例内存地址是:0x5642d634b139
Hi, 我是线程 ID:[3]
我的实例内存地址是:0x5642d634b139
main() : 创建线程:[4]
main() : 结束!
析构函数
Hi, 我是线程 ID:[4]
Hi, 我是线程 ID:[4]
我的实例内存地址是:0x5642d634b139
-std=c++0x编译是使用了C++11的特性,在C++11内部静态变量的方式里是线程安全的,只创建了一次实例。这个方式非常推荐,实现的代码最少!
- 饿汉式单例 (本身就线程安全)
#include <iostream> // std::cout
#include <pthread.h> // pthread_create
////////////////////////// 饿汉实现 /////////////////////
class Singleton
{
public:
    // 获取单实例
    static Singleton* GetInstance();

    // 释放单实例,进程退出时调用
    static void deleteInstance();

    // 打印实例地址
    void Print();

private:
    // 将其构造和析构成为私有的, 禁止外部构造和析构
    Singleton();
    ~Singleton();

    // 将其拷贝构造和赋值构造成为私有函数, 禁止外部拷贝和赋值
    Singleton(const Singleton &signal);
    const Singleton &operator=(const Singleton &signal);

private:
    // 唯一单实例对象指针
    static Singleton *g_pSingleton;
};

// 代码一运行就初始化创建实例 ,本身就线程安全
Singleton* Singleton::g_pSingleton = new (std::nothrow) Singleton;

Singleton* Singleton::GetInstance()
{
    return g_pSingleton;
}

void Singleton::deleteInstance()
{
    if (g_pSingleton)
    {
        delete g_pSingleton;
        g_pSingleton = NULL;
    }
}

void Singleton::Print()
{
    std::cout << "我的实例内存地址是:" << this << std::endl;
}

Singleton::Singleton()
{
    std::cout << "构造函数" << std::endl;
}

Singleton::~Singleton()
{
    std::cout << "析构函数" << std::endl;
}
////////////////////////// 饿汉实现 /////////////////////

// 线程函数
void *PrintHello(void *threadid)
{
    // 主线程与子线程分离,两者相互不干涉,子线程结束同时子线程的资源自动回收
    pthread_detach(pthread_self());

    // 对传入的参数进行强制类型转换,由无类型指针变为整形数指针,然后再读取
    int tid = *((int *)threadid);

    std::cout << "Hi, 我是线程 ID:[" << tid << "]" << std::endl;

    // 打印实例地址
    Singleton::GetInstance()->Print();

    pthread_exit(NULL);
}
#define NUM_THREADS 5 // 线程个数

int main(void)
{
    pthread_t threads[NUM_THREADS] = {0};
    int indexes[NUM_THREADS] = {0}; // 用数组来保存i的值

    int ret = 0;
    int i = 0;

    std::cout << "main() : 开始 ... " << std::endl;

    for (i = 0; i < NUM_THREADS; i++)
    {
        std::cout << "main() : 创建线程:[" << i << "]" << std::endl;

		indexes[i] = i; //先保存i的值

        // 传入的时候必须强制转换为void* 类型,即无类型指针
        ret = pthread_create(&threads[i], NULL, PrintHello, (void *)&(indexes[i]));
        if (ret)
        {
            std::cout << "Error:无法创建线程," << ret << std::endl;
            exit(-1);
        }
    }

    // 手动释放单实例的资源
    Singleton::deleteInstance();
    std::cout << "main() : 结束! " << std::endl;

    return 0;
}
构造函数
main() : 开始 ...
main() : 创建线程:[0]
main() : 创建线程:[1]
main() : 创建线程:[2]
Hi, 我是线程 ID:[Hi, 我是线程 ID:[10]]
我的实例内存地址是:0x5592119dee70

我的实例内存地址是:0x5592119dee70
Hi, 我是线程 ID:[2]
我的实例内存地址是:0x5592119dee70
main() : 创建线程:[3]
main() : 创建线程:[4]
Hi, 我是线程 ID:[3]
我的实例内存地址是:析构函数0x5592119dee70
main() : 结束!

Hi, 我是线程 ID:[4]
我的实例内存地址是:0
从输出可以看出,饿汉式在程序一开始就构造函数初始化了,所以本身就线程安全的。
- 懒汉式是以时间换空间,适应于访问量较小时;推荐使用内部静态变量的懒汉单例,代码量少
- 饿汉式是以空间换时间,适应于访问量较大时,或者线程比较多的的情况
工厂模式
工厂方法模式是一种创建型设计模式, 其在父类中提供一个创建对象的方法, 允许子类决定实例化对象的类型。
工厂方法模式的优点:
- 可以是创建者与具体产品之间解耦;
- 单一职责原则。可以将产品创建代码放在程序的单一位置,从而使得代码更容易维护;
- 开闭原则。无需更改现有客户端代码,就可以在程序中引入新的产品类型。
缺点:
- 应用工厂方法模式需要引入许多新的子类, 代码可能会因此变得更复杂。 最好的情况是将该模式引入创建者类的现有层次结构中。
使用示例:工厂方法模式在C++代码中得到了广泛的使用。当你需要在代码中提供高层次的灵活性时,该模式会非常实用。
识别方法:工厂方法可通过构建方法来识别,他会创建具体类的对象,但以抽象类型或者接口的形式返回这些对象。
代码实例:
#include <iostream>
using namespace std;

/**
 * The Product interface declares the operations that all concrete products must
 * implement.
 */

class Product {
 public:
  virtual ~Product() {}
  virtual std::string Operation() const = 0;
};

/**
 * Concrete Products provide various implementations of the Product interface.
 */
class ConcreteProduct1 : public Product {
 public:
  std::string Operation() const override {
    return "{Result of the ConcreteProduct1}";
  }
};
class ConcreteProduct2 : public Product {
 public:
  std::string Operation() const override {
    return "{Result of the ConcreteProduct2}";
  }
};

/**
 * The Creator class declares the factory method that is supposed to return an
 * object of a Product class. The Creator's subclasses usually provide the
 * implementation of this method.
 */

class Creator {
  /**
   * Note that the Creator may also provide some default implementation of the
   * factory method.
   */
 public:
  virtual ~Creator(){};
  virtual Product* FactoryMethod() const = 0;
  /**
   * Also note that, despite its name, the Creator's primary responsibility is
   * not creating products. Usually, it contains some core business logic that
   * relies on Product objects, returned by the factory method. Subclasses can
   * indirectly change that business logic by overriding the factory method and
   * returning a different type of product from it.
   */

  std::string SomeOperation() const {
    // Call the factory method to create a Product object.
    Product* product = this->FactoryMethod();
    // Now, use the product.
    std::string result = "Creator: The same creator's code has just worked with " + product->Operation();
    delete product;
    return result;
  }
};

/**
 * Concrete Creators override the factory method in order to change the
 * resulting product's type.
 */
class ConcreteCreator1 : public Creator {
  /**
   * Note that the signature of the method still uses the abstract product type,
   * even though the concrete product is actually returned from the method. This
   * way the Creator can stay independent of concrete product classes.
   */
 public:
  Product* FactoryMethod() const override {
    return new ConcreteProduct1();
  }
};

class ConcreteCreator2 : public Creator {
 public:
  Product* FactoryMethod() const override {
    return new ConcreteProduct2();
  }
};

/**
 * The client code works with an instance of a concrete creator, albeit through
 * its base interface. As long as the client keeps working with the creator via
 * the base interface, you can pass it any creator's subclass.
 */
void ClientCode(const Creator& creator) {
  // ...
  std::cout << "Client: I'm not aware of the creator's class, but it still works.\n"
            << creator.SomeOperation() << std::endl;
  // ...
}

/**
 * The Application picks a creator's type depending on the configuration or
 * environment.
 */

int main() {
  std::cout << "App: Launched with the ConcreteCreator1.\n";
  Creator* creator = new ConcreteCreator1();
  ClientCode(*creator);
  std::cout << std::endl;
  std::cout << "App: Launched with the ConcreteCreator2.\n";
  Creator* creator2 = new ConcreteCreator2();
  ClientCode(*creator2);

  delete creator;
  delete creator2;
  return 0;
}
输出结果:
App: Launched with the ConcreteCreator1.
Client: I'm not aware of the creator's class, but it still works.
Creator: The same creator's code has just worked with {Result of the ConcreteProduct1}

App: Launched with the ConcreteCreator2.
Client: I'm not aware of the creator's class, but it still works.
Creator: The same creator's code has just worked with {Result of the ConcreteProduct2}
抽象工厂模式
抽象工厂模式是一种创建型设计模式, 它能创建一系列相关的对象, 而无需指定其具体类。
抽象工厂定义了用于创建不同产品的接口, 但将实际的创建工作留给了具体工厂类。 每个工厂类型都对应一个特定的产品变体。
在创建产品时, 客户端代码调用的是工厂对象的构建方法, 而不是直接调用构造函数 ( new操作符)。 由于一个工厂对应一种产品变体, 因此它创建的所有产品都可相互兼容。
客户端代码仅通过其抽象接口与工厂和产品进行交互。 该接口允许同一客户端代码与不同产品进行交互。 你只需创建一个具体工厂类并将其传递给客户端代码即可。
抽象工程模式适用场景:
- 如果代码需要与多个不同系列的相关产品交互, 但是由于无法提前获取相关信息, 或者出于对未来扩展性的考虑,你不希望代码基于产品的具体类进行构建,在这种情况下,你可以使用抽象工厂。
- 抽象工厂为你提供了一个接口, 可用于创建每个系列产品的对象。 只要代码通过该接口创建对象, 那么你就不会生成与应用程序已生成的产品类型不一致的产品。
- 如果你有一个基于一组抽象方法的类,且其主要功能因此变得不明确, 那么在这种情况下可以考虑使用抽象工厂模式。
- 在设计良好的程序中, 每个类仅负责一件事。 如果一个类与多种类型产品交互, 就可以考虑将工厂方法抽取到独立的工厂类或具备完整功能的抽象工厂类中。
实现方式:
- 以不同弄的产品类型与产品变体为维度绘制矩阵;
- 为所有产品声明抽象产品接口。然后让所有的具体产品类实现这些接口;
- 声明抽象工厂接口,并且在接口中为所有抽象产品提供一组构建方法;
- 为每种产品变体实一个具体工厂类;
- 在应用程序中开发初始化代码。改代码根据具体应用程序配置或根据当前环境,对特定具体工厂类进行初始化。然后将该工厂对象传递给所有需要创建产品的类。
- 找出代码中所有对产品构造函数的直接调用,将其替换为对工厂对象中相应的构建方法的调用。
抽象工厂模式的优点:
- 可以确保同一工厂生成的产品相互匹配;
- 可以实现客户端与具体产品解耦;
- 单一职责原则。可以将产品创建代码放在程序的单一位置,从而使得代码更容易维护;
- 开闭原则。无需更改现有客户端代码,就可以在程序中引入新的产品类型。
缺点:
- 由于采用该模式需要向应用中引入众多接口和类, 代码可能会比之前更加复杂。
使用示例: 抽象工厂模式在 C++ 代码中很常见。 许多框架和程序库会将它作为扩展和自定义其标准组件的一种方式。
识别方法: 我们可以通过方法来识别该模式——其会返回一个工厂对象。 接下来, 工厂将被用于创建特定的子组件。
代码示例:
#include <iostream>
using namespace std;

/**
 * Each distinct product of a product family should have a base interface. All
 * variants of the product must implement this interface.
 */
class AbstractProductA {
 public:
  virtual ~AbstractProductA(){};
  virtual std::string UsefulFunctionA() const = 0;
};

/**
 * Concrete Products are created by corresponding Concrete Factories.
 */
class ConcreteProductA1 : public AbstractProductA {
 public:
  std::string UsefulFunctionA() const override {
    return "The result of the product A1.";
  }
};

class ConcreteProductA2 : public AbstractProductA {
  std::string UsefulFunctionA() const override {
    return "The result of the product A2.";
  }
};

/**
 * Here's the the base interface of another product. All products can interact
 * with each other, but proper interaction is possible only between products of
 * the same concrete variant.
 */
class AbstractProductB {
  /**
   * Product B is able to do its own thing...
   */
 public:
  virtual ~AbstractProductB(){};
  virtual std::string UsefulFunctionB() const = 0;
  /**
   * ...but it also can collaborate with the ProductA.
   *
   * The Abstract Factory makes sure that all products it creates are of the
   * same variant and thus, compatible.
   */
  virtual std::string AnotherUsefulFunctionB(const AbstractProductA &collaborator) const = 0;
};

/**
 * Concrete Products are created by corresponding Concrete Factories.
 */
class ConcreteProductB1 : public AbstractProductB {
 public:
  std::string UsefulFunctionB() const override {
    return "The result of the product B1.";
  }
  /**
   * The variant, Product B1, is only able to work correctly with the variant,
   * Product A1. Nevertheless, it accepts any instance of AbstractProductA as an
   * argument.
   */
  std::string AnotherUsefulFunctionB(const AbstractProductA &collaborator) const override {
    const std::string result = collaborator.UsefulFunctionA();
    return "The result of the B1 collaborating with ( " + result + " )";
  }
};

class ConcreteProductB2 : public AbstractProductB {
 public:
  std::string UsefulFunctionB() const override {
    return "The result of the product B2.";
  }
  /**
   * The variant, Product B2, is only able to work correctly with the variant,
   * Product A2. Nevertheless, it accepts any instance of AbstractProductA as an
   * argument.
   */
  std::string AnotherUsefulFunctionB(const AbstractProductA &collaborator) const override {
    const std::string result = collaborator.UsefulFunctionA();
    return "The result of the B2 collaborating with ( " + result + " )";
  }
};

/**
 * The Abstract Factory interface declares a set of methods that return
 * different abstract products. These products are called a family and are
 * related by a high-level theme or concept. Products of one family are usually
 * able to collaborate among themselves. A family of products may have several
 * variants, but the products of one variant are incompatible with products of
 * another.
 */
class AbstractFactory {
 public:
  virtual AbstractProductA *CreateProductA() const = 0;
  virtual AbstractProductB *CreateProductB() const = 0;
};

/**
 * Concrete Factories produce a family of products that belong to a single
 * variant. The factory guarantees that resulting products are compatible. Note
 * that signatures of the Concrete Factory's methods return an abstract product,
 * while inside the method a concrete product is instantiated.
 */
class ConcreteFactory1 : public AbstractFactory {
 public:
  AbstractProductA *CreateProductA() const override {
    return new ConcreteProductA1();
  }
  AbstractProductB *CreateProductB() const override {
    return new ConcreteProductB1();
  }
};

/**
 * Each Concrete Factory has a corresponding product variant.
 */
class ConcreteFactory2 : public AbstractFactory {
 public:
  AbstractProductA *CreateProductA() const override {
    return new ConcreteProductA2();
  }
  AbstractProductB *CreateProductB() const override {
    return new ConcreteProductB2();
  }
};

/**
 * The client code works with factories and products only through abstract
 * types: AbstractFactory and AbstractProduct. This lets you pass any factory or
 * product subclass to the client code without breaking it.
 */

void ClientCode(const AbstractFactory &factory) {
  const AbstractProductA *product_a = factory.CreateProductA();
  const AbstractProductB *product_b = factory.CreateProductB();
  std::cout << product_b->UsefulFunctionB() << "\n";
  std::cout << product_b->AnotherUsefulFunctionB(*product_a) << "\n";
  delete product_a;
  delete product_b;
}

int main() {
  std::cout << "Client: Testing client code with the first factory type:\n";
  ConcreteFactory1 *f1 = new ConcreteFactory1();
  ClientCode(*f1);
  delete f1;
  std::cout << std::endl;
  std::cout << "Client: Testing the same client code with the second factory type:\n";
  ConcreteFactory2 *f2 = new ConcreteFactory2();
  ClientCode(*f2);
  delete f2;
  return 0;
}
输出结果:
Client: Testing client code with the first factory type:
The result of the product B1.
The result of the B1 collaborating with ( The result of the product A1. )

Client: Testing the same client code with the second factory type:
The result of the product B2.
The result of the B2 collaborating with ( The result of the product A2. )
生成器模式
也叫建造者模式、Builder
生成器模式是一种创建型设计模式, 使你能够分步骤创建复杂对象。 该模式允许你使用相同的创建代码生成不同类型和形式的对象。
- 使用示例:生成器模式是 C++ 世界中的一个著名模式。 当你需要创建一个可能有许多配置选项的对象时, 该模式会特别有用。
- 识别方法: 生成器模式可以通过类来识别, 它拥有一个构建方法和多个配置结果对象的方法。 生成器方法通常支持方法链 (例如
someBuilder->setValueA(1)->setValueB(2)->create())。
代码示例
#include <iostream>
#include <vector>
#include <string>
/**
 * It makes sense to use the Builder pattern only when your products are quite
 * complex and require extensive configuration.
 *
 * Unlike in other creational patterns, different concrete builders can produce
 * unrelated products. In other words, results of various builders may not
 * always follow the same interface.
 */

class Product1{
    public:
    std::vector<std::string> parts_;
    void ListParts()const{
        std::cout << "Product parts: ";
        for (size_t i=0;i<parts_.size();i++){
            if(parts_[i]== parts_.back()){
                std::cout << parts_[i];
            }else{
                std::cout << parts_[i] << ", ";
            }
        }
        std::cout << "\n\n";
    }
};


/**
 * The Builder interface specifies methods for creating the different parts of
 * the Product objects.
 */
class Builder{
    public:
    virtual ~Builder(){}
    virtual void ProducePartA() const =0;
    virtual void ProducePartB() const =0;
    virtual void ProducePartC() const =0;
};
/**
 * The Concrete Builder classes follow the Builder interface and provide
 * specific implementations of the building steps. Your program may have several
 * variations of Builders, implemented differently.
 */
class ConcreteBuilder1 : public Builder{
    private:

    Product1* product;

    /**
     * A fresh builder instance should contain a blank product object, which is
     * used in further assembly.
     */
    public:

    ConcreteBuilder1(){
        this->Reset();
    }

    ~ConcreteBuilder1(){
        delete product;
    }

    void Reset(){
        this->product= new Product1();
    }
    /**
     * All production steps work with the same product instance.
     */

    void ProducePartA()const override{
        this->product->parts_.push_back("PartA1");
    }

    void ProducePartB()const override{
        this->product->parts_.push_back("PartB1");
    }

    void ProducePartC()const override{
        this->product->parts_.push_back("PartC1");
    }

    /**
     * Concrete Builders are supposed to provide their own methods for
     * retrieving results. That's because various types of builders may create
     * entirely different products that don't follow the same interface.
     * Therefore, such methods cannot be declared in the base Builder interface
     * (at least in a statically typed programming language). Note that PHP is a
     * dynamically typed language and this method CAN be in the base interface.
     * However, we won't declare it there for the sake of clarity.
     *
     * Usually, after returning the end result to the client, a builder instance
     * is expected to be ready to start producing another product. That's why
     * it's a usual practice to call the reset method at the end of the
     * `getProduct` method body. However, this behavior is not mandatory, and
     * you can make your builders wait for an explicit reset call from the
     * client code before disposing of the previous result.
     */

    /**
     * Please be careful here with the memory ownership. Once you call
     * GetProduct the user of this function is responsable to release this
     * memory. Here could be a better option to use smart pointers to avoid
     * memory leaks
     */

    Product1* GetProduct() {
        Product1* result= this->product;
        this->Reset();
        return result;
    }
};

/**
 * The Director is only responsible for executing the building steps in a
 * particular sequence. It is helpful when producing products according to a
 * specific order or configuration. Strictly speaking, the Director class is
 * optional, since the client can control builders directly.
 */
class Director{
    /**
     * @var Builder
     */
    private:
    Builder* builder;
    /**
     * The Director works with any builder instance that the client code passes
     * to it. This way, the client code may alter the final type of the newly
     * assembled product.
     */

    public:

    void set_builder(Builder* builder){
        this->builder=builder;
    }

    /**
     * The Director can construct several product variations using the same
     * building steps.
     */

    void BuildMinimalViableProduct(){
        this->builder->ProducePartA();
    }

    void BuildFullFeaturedProduct(){
        this->builder->ProducePartA();
        this->builder->ProducePartB();
        this->builder->ProducePartC();
    }
};
/**
 * The client code creates a builder object, passes it to the director and then
 * initiates the construction process. The end result is retrieved from the
 * builder object.
 */
/**
 * I used raw pointers for simplicity however you may prefer to use smart
 * pointers here
 */
void ClientCode(Director& director)
{
    ConcreteBuilder1* builder = new ConcreteBuilder1();
    director.set_builder(builder);
    std::cout << "Standard basic product:\n";
    director.BuildMinimalViableProduct();

    Product1* p= builder->GetProduct();
    p->ListParts();
    delete p;

    std::cout << "Standard full featured product:\n";
    director.BuildFullFeaturedProduct();

    p= builder->GetProduct();
    p->ListParts();
    delete p;

    // Remember, the Builder pattern can be used without a Director class.
    std::cout << "Custom product:\n";
    builder->ProducePartA();
    builder->ProducePartC();
    p=builder->GetProduct();
    p->ListParts();
    delete p;

    delete builder;
}

int main(){
    Director* director= new Director();
    ClientCode(*director);
    delete director;
    return 0;
}
输出结果:
Standard basic product:
Product parts: PartA1

Standard full featured product:
Product parts: PartA1, PartB1, PartC1

Custom product:
Product parts: PartA1, PartC
生成器模式的优缺点:
优点:
- 分步骤创建对象;
- 生成不同形式的产品时可以复用相同的制造代码;
- 单一职责原则。可以将复杂的构造代码从产品的业务逻辑中分离出来;
缺点:
- 由于该模式需要新增多个类,因此代码整体复杂程度会有所增加。
结构型
代理模式
代理是一种结构型设计模式, 让你能提供真实服务对象的替代品给客户端使用。 代理接收客户端的请求并进行一些处理 (访问控制和缓存等), 然后再将请求传递给服务对象。
代理对象拥有和服务对象相同的接口, 这使得当其被传递给客户端时可与真实对象互换。
应用场景:
- 延迟初始化 (虚拟代理)。如果你有一个偶尔使用的重量级服务对象,一直保持该对象运行会消耗系统资源时,可使用代理模式。你无需在程序启动时就创建该对象, 可将对象的初始化延迟到真正有需要的时候。
- 访问控制 (保护代理)。 如果你只希望特定客户端使用服务对象, 这里的对象可以是操作系统中非常重要的部分, 而客户端则是各种已启动的程序 (包括恶意程序), 此时可使用代理模式。
- 本地执行远程服务 (远程代理)。 适用于服务对象位于远程服务器上的情形。
- 记录日志请求 (日志记录代理)。适用于当你需要保存对于服务对象的请求历史记录时。
- 缓存请求结果 (缓存代理)。 适用于需要缓存客户请求结果并对缓存生命周期进行管理时, 特别是当返回结果的体积非常大时。
- 智能引用。 可在没有客户端使用某个重量级对象时立即销毁该对象。代理会将所有获取了指向服务对象或其结果的客户端记录在案。 代理会时不时地遍历各个客户端, 检查它们是否仍在运行。 如果相应的客户端列表为空, 代理就会销毁该服务对象, 释放底层系统资源。
实现方式
- 如果没有现成的服务接口, 你就需要创建一个接口来实现代理和服务对象的可交换性。 从服务类中抽取接口并非总是可行的, 因为你需要对服务的所有客户端进行修改, 让它们使用接口。 备选计划是将代理作为服务类的子类, 这样代理就能继承服务的所有接口了。
- 创建代理类, 其中必须包含一个存储指向服务的引用的成员变量。 通常情况下, 代理负责创建服务并对其整个生命周期进行管理。 在一些特殊情况下, 客户端会通过构造函数将服务传递给代理。
- 根据需求实现代理方法。 在大部分情况下, 代理在完成一些任务后应将工作委派给服务对象。
- 可以考虑新建一个构建方法来判断客户端可获取的是代理还是实际服务。 你可以在代理类中创建一个简单的静态方法, 也可以创建一个完整的工厂方法。
- 可以考虑为服务对象实现延迟初始化。
代理模式优缺点
优点:
- 你可以在客户端毫无察觉的情况下控制服务对象。
- 如果客户端对服务对象的生命周期没有特殊要求, 你可以对生命周期进行管理。
- 即使服务对象还未准备好或不存在, 代理也可以正常工作。
- 开闭原则。 你可以在不对服务或客户端做出修改的情况下创建新代理。
缺点:
- 代码可能会变得复杂, 因为需要新建许多类。
- 服务响应可能会延迟。
使用示例: 尽管代理模式在绝大多数 C++ 程序中并不常见, 但它在一些特殊情况下仍然非常方便。 当你希望在无需修改客户代码的前提下于已有类的对象上增加额外行为时, 该模式是无可替代的。
识别方法: 代理模式会将所有实际工作委派给一些其他对象。 除非代理是某个服务的子类, 否则每个代理方法最后都应该引用一个服务对象。
代码示例:
#include <iostream>
/**
 * The Subject interface declares common operations for both RealSubject and the
 * Proxy. As long as the client works with RealSubject using this interface,
 * you'll be able to pass it a proxy instead of a real subject.
 */
class Subject {
 public:
  virtual void Request() const = 0;
};
/**
 * The RealSubject contains some core business logic. Usually, RealSubjects are
 * capable of doing some useful work which may also be very slow or sensitive -
 * e.g. correcting input data. A Proxy can solve these issues without any
 * changes to the RealSubject's code.
 */
class RealSubject : public Subject {
 public:
  void Request() const override {
    std::cout << "RealSubject: Handling request.\n";
  }
};
/**
 * The Proxy has an interface identical to the RealSubject.
 */
class Proxy : public Subject {
  /**
   * @var RealSubject
   */
 private:
  RealSubject *real_subject_;

  bool CheckAccess() const {
    // Some real checks should go here.
    std::cout << "Proxy: Checking access prior to firing a real request.\n";
    return true;
  }
  void LogAccess() const {
    std::cout << "Proxy: Logging the time of request.\n";
  }

  /**
   * The Proxy maintains a reference to an object of the RealSubject class. It
   * can be either lazy-loaded or passed to the Proxy by the client.
   */
 public:
  Proxy(RealSubject *real_subject) : real_subject_(new RealSubject(*real_subject)) {
  }

  ~Proxy() {
    delete real_subject_;
  }
  /**
   * The most common applications of the Proxy pattern are lazy loading,
   * caching, controlling the access, logging, etc. A Proxy can perform one of
   * these things and then, depending on the result, pass the execution to the
   * same method in a linked RealSubject object.
   */
  void Request() const override {
    if (this->CheckAccess()) {
      this->real_subject_->Request();
      this->LogAccess();
    }
  }
};
/**
 * The client code is supposed to work with all objects (both subjects and
 * proxies) via the Subject interface in order to support both real subjects and
 * proxies. In real life, however, clients mostly work with their real subjects
 * directly. In this case, to implement the pattern more easily, you can extend
 * your proxy from the real subject's class.
 */
void ClientCode(const Subject &subject) {
  // ...
  subject.Request();
  // ...
}

int main() {
  std::cout << "Client: Executing the client code with a real subject:\n";
  RealSubject *real_subject = new RealSubject;
  ClientCode(*real_subject);
  std::cout << "\n";
  std::cout << "Client: Executing the same client code with a proxy:\n";
  Proxy *proxy = new Proxy(real_subject);
  ClientCode(*proxy);

  delete real_subject;
  delete proxy;
  return 0;
}
输出结果:
Client: Executing the client code with a real subject:
RealSubject: Handling request.

Client: Executing the same client code with a proxy:
Proxy: Checking access prior to firing a real request.
RealSubject: Handling request.
Proxy: Logging the time of request.
适配器模式
适配器是一种结构型设计模式, 它能使不兼容的对象能够相互合作。适配器可担任两个对象间的封装器, 它会接收对于一个对象的调用, 并将其转换为另一个对象可识别的格式和接口。
使用示例: 适配器模式在 C++ 代码中很常见。 基于一些遗留代码的系统常常会使用该模式。 在这种情况下, 适配器让遗留代码与现代的类得以相互合作。
识别方法: 适配器可以通过以不同抽象或接口类型实例为参数的构造函数来识别。 当适配器的任何方法被调用时, 它会将参数转换为合适的格式, 然后将调用定向到其封装对象中的一个或多个方法。
应用场景:
- 当你希望使用某个类, 但是其接口与其他代码不兼容时, 可以使用适配器类。
- 适配器模式允许你创建一个中间层类, 其可作为代码与遗留类、 第三方类或提供怪异接口的类之间的转换器。
- 如果您需要复用这样一些类, 他们处于同一个继承体系, 并且他们又有了额外的一些共同的方法, 但是这些共同的方法不是所有在这一继承体系中的子类所具有的共性。
实例代码1
#include <string>
#include <algorithm>
#include <iostream>
/**
 * The Target defines the domain-specific interface used by the client code.
 */
class Target {
 public:
  virtual ~Target() = default;

  virtual std::string Request() const {
    return "Target: The default target's behavior.";
  }
};

/**
 * The Adaptee contains some useful behavior, but its interface is incompatible
 * with the existing client code. The Adaptee needs some adaptation before the
 * client code can use it.
 */
class Adaptee {
 public:
  std::string SpecificRequest() const {
    return ".eetpadA eht fo roivaheb laicepS";
  }
};

/**
 * The Adapter makes the Adaptee's interface compatible with the Target's
 * interface.
 */
class Adapter : public Target {
 private:
  Adaptee *adaptee_;

 public:
  Adapter(Adaptee *adaptee) : adaptee_(adaptee) {}
  std::string Request() const override {
    std::string to_reverse = this->adaptee_->SpecificRequest();
    std::reverse(to_reverse.begin(), to_reverse.end());
    return "Adapter: (TRANSLATED) " + to_reverse;
  }
};

/**
 * The client code supports all classes that follow the Target interface.
 */
void ClientCode(const Target *target) {
  std::cout << target->Request();
}

int main() {
  std::cout << "Client: I can work just fine with the Target objects:\n";
  Target *target = new Target;
  ClientCode(target);
  std::cout << "\n\n";
  Adaptee *adaptee = new Adaptee;
  std::cout << "Client: The Adaptee class has a weird interface. See, I don't understand it:\n";
  std::cout << "Adaptee: " << adaptee->SpecificRequest();
  std::cout << "\n\n";
  std::cout << "Client: But I can work with it via the Adapter:\n";
  Adapter *adapter = new Adapter(adaptee);
  ClientCode(adapter);
  std::cout << "\n";

  delete target;
  delete adaptee;
  delete adapter;

  return 0;
}
输出打印:
Client: I can work just fine with the Target objects:
Target: The default target's behavior.

Client: The Adaptee class has a weird interface. See, I don't understand it:
Adaptee: .eetpadA eht fo roivaheb laicepS

Client: But I can work with it via the Adapter:
Adapter: (TRANSLATED) Special behavior of the Adaptee.
实例代码2(多重继承)
可以使用多重继承来实现适配器模式
#include <string>
#include <algorithm>
#include <iostream>
/**
 * The Target defines the domain-specific interface used by the client code.
 */
class Target {
 public:
  virtual ~Target() = default;
  virtual std::string Request() const {
    return "Target: The default target's behavior.";
  }
};

/**
 * The Adaptee contains some useful behavior, but its interface is incompatible
 * with the existing client code. The Adaptee needs some adaptation before the
 * client code can use it.
 */
class Adaptee {
 public:
  std::string SpecificRequest() const {
    return ".eetpadA eht fo roivaheb laicepS";
  }
};

/**
 * The Adapter makes the Adaptee's interface compatible with the Target's
 * interface using multiple inheritance.
 */
class Adapter : public Target, public Adaptee {
 public:
  Adapter() {}
  std::string Request() const override {
    std::string to_reverse = SpecificRequest();
    std::reverse(to_reverse.begin(), to_reverse.end());
    return "Adapter: (TRANSLATED) " + to_reverse;
  }
};

/**
 * The client code supports all classes that follow the Target interface.
 */
void ClientCode(const Target *target) {
  std::cout << target->Request();
}

int main() {
  std::cout << "Client: I can work just fine with the Target objects:\n";
  Target *target = new Target;
  ClientCode(target);
  std::cout << "\n\n";
  Adaptee *adaptee = new Adaptee;
  std::cout << "Client: The Adaptee class has a weird interface. See, I don't understand it:\n";
  std::cout << "Adaptee: " << adaptee->SpecificRequest();
  std::cout << "\n\n";
  std::cout << "Client: But I can work with it via the Adapter:\n";
  Adapter *adapter = new Adapter;
  ClientCode(adapter);
  std::cout << "\n";

  delete target;
  delete adaptee;
  delete adapter;

  return 0;
}
输出打印:
Client: I can work just fine with the Target objects:
Target: The default target's behavior.

Client: The Adaptee class has a weird interface. See, I don't understand it:
Adaptee: .eetpadA eht fo roivaheb laicepS

Client: But I can work with it via the Adapter:
Adapter: (TRANSLATED) Special behavior of the Adaptee.
装饰器模式
装饰是一种结构设计模式, 允许你通过将对象放入特殊封装对象中来为原对象增加新的行为。由于目标对象和装饰器遵循同一接口, 因此你可用装饰来对对象进行无限次的封装。 结果对象将获得所有封装器叠加而来的行为。
主要解决:一般的,我们为了扩展一个类经常使用继承方式实现,由于继承为类引入静态特征,并且随着扩展功能的增多,子类会很膨胀。
何时使用:在不想增加很多子类的情况下扩展类。
使用示例:装饰在 C++ 代码中可谓是标准配置, 尤其是在与流式加载相关的代码中。(比如IO处理中的stream)
识别方法: 装饰可通过以当前类或对象为参数的创建方法或构造函数来识别。
代码示例:
#include <iostream>
/**
 * The base Component interface defines operations that can be altered by
 * decorators.
 */
class Component {
 public:
  virtual ~Component() {}
  virtual std::string Operation() const = 0;
};
/**
 * Concrete Components provide default implementations of the operations. There
 * might be several variations of these classes.
 */
class ConcreteComponent : public Component {
 public:
  std::string Operation() const override {
    return "ConcreteComponent";
  }
};
/**
 * The base Decorator class follows the same interface as the other components.
 * The primary purpose of this class is to define the wrapping interface for all
 * concrete decorators. The default implementation of the wrapping code might
 * include a field for storing a wrapped component and the means to initialize
 * it.
 */
class Decorator : public Component {
  /**
   * @var Component
   */
 protected:
  Component* component_;

 public:
  Decorator(Component* component) : component_(component) {
  }
  /**
   * The Decorator delegates all work to the wrapped component.
   */
  std::string Operation() const override {
    return this->component_->Operation();
  }
};
/**
 * Concrete Decorators call the wrapped object and alter its result in some way.
 */
class ConcreteDecoratorA : public Decorator {
  /**
   * Decorators may call parent implementation of the operation, instead of
   * calling the wrapped object directly. This approach simplifies extension of
   * decorator classes.
   */
 public:
  ConcreteDecoratorA(Component* component) : Decorator(component) {
  }
  std::string Operation() const override {
    return "ConcreteDecoratorA(" + Decorator::Operation() + ")";
  }
};
/**
 * Decorators can execute their behavior either before or after the call to a
 * wrapped object.
 */
class ConcreteDecoratorB : public Decorator {
 public:
  ConcreteDecoratorB(Component* component) : Decorator(component) {
  }

  std::string Operation() const override {
    return "ConcreteDecoratorB(" + Decorator::Operation() + ")";
  }
};
/**
 * The client code works with all objects using the Component interface. This
 * way it can stay independent of the concrete classes of components it works
 * with.
 */
void ClientCode(Component* component) {
  // ...
  std::cout << "RESULT: " << component->Operation();
  // ...
}

int main() {
  /**
   * This way the client code can support both simple components...
   */
  Component* simple = new ConcreteComponent;
  std::cout << "Client: I've got a simple component:\n";
  ClientCode(simple);
  std::cout << "\n\n";
  /**
   * ...as well as decorated ones.
   *
   * Note how decorators can wrap not only simple components but the other
   * decorators as well.
   */
  Component* decorator1 = new ConcreteDecoratorA(simple);
  Component* decorator2 = new ConcreteDecoratorB(decorator1);
  std::cout << "Client: Now I've got a decorated component:\n";
  ClientCode(decorator2);
  std::cout << "\n";

  delete simple;
  delete decorator1;
  delete decorator2;

  return 0;
}
输出:
Client: I've got a simple component:
RESULT: ConcreteComponent

Client: Now I've got a decorated component:
RESULT: ConcreteDecoratorB(ConcreteDecoratorA(ConcreteComponent))
行为型
观察者模式
观察者模式是一种行为设计模式, 允许你定义一种订阅机制, 可在对象事件发生时通知多个 “观察” 该对象的其他对象。
首先介绍经典的观察者模式的C++实现:
/**
 * Observer Design Pattern
 *
 * Intent: Lets you define a subscription mechanism to notify multiple objects
 * about any events that happen to the object they're observing.
 *
 * Note that there's a lot of different terms with similar meaning associated
 * with this pattern. Just remember that the Subject is also called the
 * Publisher and the Observer is often called the Subscriber and vice versa.
 * Also the verbs "observe", "listen" or "track" usually mean the same thing.
 */

#include <iostream>
#include <list>
#include <string>

class IObserver {
 public:
  virtual ~IObserver(){};
  virtual void Update(const std::string &message_from_subject) = 0;
};

class ISubject {
 public:
  virtual ~ISubject(){};
  virtual void Attach(IObserver *observer) = 0;
  virtual void Detach(IObserver *observer) = 0;
  virtual void Notify() = 0;
};

/**
 * The Subject owns some important state and notifies observers when the state
 * changes.
 */

class Subject : public ISubject {
 public:
  virtual ~Subject() {
    std::cout << "Goodbye, I was the Subject.\n";
  }

  /**
   * The subscription management methods.
   */
  void Attach(IObserver *observer) override {
    list_observer_.push_back(observer);
  }
  void Detach(IObserver *observer) override {
    list_observer_.remove(observer);
  }
  void Notify() override {
    std::list<IObserver *>::iterator iterator = list_observer_.begin();
    HowManyObserver();
    while (iterator != list_observer_.end()) {
      (*iterator)->Update(message_);
      ++iterator;
    }
  }

  void CreateMessage(std::string message = "Empty") {
    this->message_ = message;
    Notify();
  }
  void HowManyObserver() {
    std::cout << "There are " << list_observer_.size() << " observers in the list.\n";
  }

  /**
   * Usually, the subscription logic is only a fraction of what a Subject can
   * really do. Subjects commonly hold some important business logic, that
   * triggers a notification method whenever something important is about to
   * happen (or after it).
   */
  void SomeBusinessLogic() {
    this->message_ = "change message message";
    Notify();
    std::cout << "I'm about to do some thing important\n";
  }

 private:
  std::list<IObserver *> list_observer_;
  std::string message_;
};

class Observer : public IObserver {
 public:
  Observer(Subject &subject) : subject_(subject) {
    this->subject_.Attach(this);
    std::cout << "Hi, I'm the Observer \"" << ++Observer::static_number_ << "\".\n";
    this->number_ = Observer::static_number_;
  }
  virtual ~Observer() {
    std::cout << "Goodbye, I was the Observer \"" << this->number_ << "\".\n";
  }

  void Update(const std::string &message_from_subject) override {
    message_from_subject_ = message_from_subject;
    PrintInfo();
  }
  void RemoveMeFromTheList() {
    subject_.Detach(this);
    std::cout << "Observer \"" << number_ << "\" removed from the list.\n";
  }
  void PrintInfo() {
    std::cout << "Observer \"" << this->number_ << "\": a new message is available --> " << this->message_from_subject_ << "\n";
  }

 private:
  std::string message_from_subject_;
  Subject &subject_;
  static int static_number_;
  int number_;
};

int Observer::static_number_ = 0;

void ClientCode() {
  Subject *subject = new Subject;
  Observer *observer1 = new Observer(*subject);
  Observer *observer2 = new Observer(*subject);
  Observer *observer3 = new Observer(*subject);
  Observer *observer4;
  Observer *observer5;

  subject->CreateMessage("Hello World! :D");
  observer3->RemoveMeFromTheList();

  subject->CreateMessage("The weather is hot today! :p");
  observer4 = new Observer(*subject);

  observer2->RemoveMeFromTheList();
  observer5 = new Observer(*subject);

  subject->CreateMessage("My new car is great! ;)");
  observer5->RemoveMeFromTheList();

  observer4->RemoveMeFromTheList();
  observer1->RemoveMeFromTheList();

  delete observer5;
  delete observer4;
  delete observer3;
  delete observer2;
  delete observer1;
  delete subject;
}

int main() {
  ClientCode();
  return 0;
}
输出结果:
Hi, I'm the Observer "1".
Hi, I'm the Observer "2".
Hi, I'm the Observer "3".
There are 3 observers in the list.
Observer "1": a new message is available --> Hello World! :D
Observer "2": a new message is available --> Hello World! :D
Observer "3": a new message is available --> Hello World! :D
Observer "3" removed from the list.
There are 2 observers in the list.
Observer "1": a new message is available --> The weather is hot today! :p
Observer "2": a new message is available --> The weather is hot today! :p
Hi, I'm the Observer "4".
Observer "2" removed from the list.
Hi, I'm the Observer "5".
There are 3 observers in the list.
Observer "1": a new message is available --> My new car is great! ;)
Observer "4": a new message is available --> My new car is great! ;)
Observer "5": a new message is available --> My new car is great! ;)
Observer "5" removed from the list.
Observer "4" removed from the list.
Observer "1" removed from the list.
Goodbye, I was the Observer "5".
Goodbye, I was the Observer "4".
Goodbye, I was the Observer "3".
Goodbye, I was the Observer "2".
Goodbye, I was the Observer "1".
Goodbye, I was the Subject.
以上为经典观察者模式的实现,但这个实现也存在一些缺点:
- 实现不够通用,只对特定的观察者有效,即必须是IObserver抽象类的派生类才行;
- 观察者类不能带参数,即使提供了可以指定几个参数的观察者方法,但仍然不够通用。
以上两个问题可以通过新版本的C++做一些改进:
- 通过被通知接口参数化和使用std::function来代替继承;
- 通过可变参数模板和完美转发来消除接口变化产生的影响。
改进之后的观察者模式和C#的event相似,通过定义委托类型来限定观察者,不要求观察者必须是从某个类派生,当需要和原来不同的观察者时,只需要定义新的event类型即可,通过event还可以方便的增加和移除观察者。
改进后的代码:
#include <functional>
#include <string>
#include <map>
#include <iostream>
using namespace std;

class NonCopybale
{
 public:
  NonCopybale(const NonCopybale&) = delete;
  void operator=(const NonCopybale&) = delete;

 protected:
  NonCopybale() = default;
  ~NonCopybale() = default;
};

template<typename Func>
class Event : public NonCopybale
{
public:
	Event(/* args */) = default;
	~Event() = default;
	//注册观察者
	int Connect(Func&& f)
	{
		return Assign(f);
	}
	int Connect(const Func& f)
	{
		return Assign(f);
	}
	//移除观察者
	void DisConnect(int key)
	{
		connections_.erase(key);
		std::cout << "size: " << connections_.size() << std::endl;
	}
	//通知所有观察者
	template<typename ...Args>
	void Notify(Args&& ...args)
	{
		for(auto& p : connections_) {
			p.second(std::forward<Args>(args)...);
		}
	}
private:
	template<typename F>
	int Assign(F&& f)
	{
		int k = observer_id_++;
		connections_.emplace(k, std::forward<F>(f));
		std::cout << "size: " << connections_.size() << std::endl;
		return k;
	}
private:
	int observer_id_;
	std::map<int, Func> connections_;
};

struct Obj
{
	void print(int a, int b)
	{
		std::cout << a << ", " << b << std::endl;
	}
};
void print(int a, int b)
{
	std::cout << a << ", " << b << std::endl;
}


int main()
{
	Event<std::function<void(int,int)>> event;
	//注册普通函数
	int key1 = event.Connect(print);
	Obj ob;
	//注册lambda
	int key2 = event.Connect([](int a, int b) {
        std::cout << a << ", " << b << std::endl;
    });
	//funciton注册
	std::function<void(int,int)> f =
			std::bind(&Obj::print, &ob, std::placeholders::_1, std::placeholders::_2);
	int key3 = event.Connect(f);
	int a = 111, b = 222;
	event.Notify(a, b);
	//移除观察者
	event.DisConnect(key1);
	a = 444; b = 555;
	event.Notify(a, b);
  	return 0;

}
C++11实现的观察者模式,内部维护泛型函数列表,观察者只需要将观察者函数注册到要观察的事件Event中即可,消除了继承导致的强耦合。同时通知的接口使用可变参数模板,支持任意参数,消除了接口变化的影响。
策略模式
策略是一种行为设计模式, 它将一组行为转换为对象, 并使其在原始上下文对象内部能够相互替换。
原始对象被称为上下文, 它包含指向策略对象的引用并将执行行为的任务分派给策略对象。 为了改变上下文完成其工作的方式, 其他对象可以使用另一个对象来替换当前链接的策略对象。
使用示例: 策略模式在 C++ 代码中很常见。 它经常在各种框架中使用, 能在不扩展类的情况下向用户提供改变其行为的方式。
识别方法: 策略模式可以通过允许嵌套对象完成实际工作的方法以及允许将该对象替换为不同对象的设置器来识别。
示例代码:
#include <iostream>
#include <memory>
#include <algorithm>
/**
 * The Strategy interface declares operations common to all supported versions
 * of some algorithm.
 *
 * The Context uses this interface to call the algorithm defined by Concrete
 * Strategies.
 */
class Strategy
{
public:
    virtual ~Strategy() = default;
    virtual std::string doAlgorithm(std::string_view data) const = 0;
};

/**
 * The Context defines the interface of interest to clients.
 */

class Context
{
    /**
     * @var Strategy The Context maintains a reference to one of the Strategy
     * objects. The Context does not know the concrete class of a strategy. It
     * should work with all strategies via the Strategy interface.
     */
private:
    std::unique_ptr<Strategy> strategy_;
    /**
     * Usually, the Context accepts a strategy through the constructor, but also
     * provides a setter to change it at runtime.
     */
public:
    explicit Context(std::unique_ptr<Strategy> &&strategy = {}) : strategy_(std::move(strategy))
    {
    }
    /**
     * Usually, the Context allows replacing a Strategy object at runtime.
     */
    void set_strategy(std::unique_ptr<Strategy> &&strategy)
    {
        strategy_ = std::move(strategy);
    }
    /**
     * The Context delegates some work to the Strategy object instead of
     * implementing +multiple versions of the algorithm on its own.
     */
    void doSomeBusinessLogic() const
    {
        if (strategy_) {
            std::cout << "Context: Sorting data using the strategy (not sure how it'll do it)\n";
            std::string result = strategy_->doAlgorithm("aecbd");
            std::cout << result << "\n";
        } else {
            std::cout << "Context: Strategy isn't set\n";
        }
    }
};

/**
 * Concrete Strategies implement the algorithm while following the base Strategy
 * interface. The interface makes them interchangeable in the Context.
 */
class ConcreteStrategyA : public Strategy
{
public:
    std::string doAlgorithm(std::string_view data) const override
    {
        std::string result(data);
        std::sort(std::begin(result), std::end(result));

        return result;
    }
};
class ConcreteStrategyB : public Strategy
{
    std::string doAlgorithm(std::string_view data) const override
    {
        std::string result(data);
        std::sort(std::begin(result), std::end(result), std::greater<>());

        return result;
    }
};
/**
 * The client code picks a concrete strategy and passes it to the context. The
 * client should be aware of the differences between strategies in order to make
 * the right choice.
 */

void clientCode()
{
    Context context(std::make_unique<ConcreteStrategyA>());
    std::cout << "Client: Strategy is set to normal sorting.\n";
    context.doSomeBusinessLogic();
    std::cout << "\n";
    std::cout << "Client: Strategy is set to reverse sorting.\n";
    context.set_strategy(std::make_unique<ConcreteStrategyB>());
    context.doSomeBusinessLogic();
}

int main()
{
    clientCode();
    return 0;
}
输出结果:
Client: Strategy is set to normal sorting.
Context: Sorting data using the strategy (not sure how it'll do it)
abcde

Client: Strategy is set to reverse sorting.
Context: Sorting data using the strategy (not sure how it'll do it)
edcba
设计模式最佳实践学习
参考
- https://refactoringguru.cn/design-patterns
- 祁宇 «深入应用C++11:代码优化与工程级应用»
- https://www.cnblogs.com/xiaolincoding/p/11437231.html
- https://mp.weixin.qq.com/s/j7W8NH9mS8-xtLS_O2PjJA
文档信息
- 本文作者:JianZheng
- 本文链接:https://zhengjian526.github.io/left-handed_knife//2023/04/19/Design-patterns/
- 版权声明:自由转载-非商用-非衍生-保持署名(创意共享3.0许可证)